 Save to Pinterest
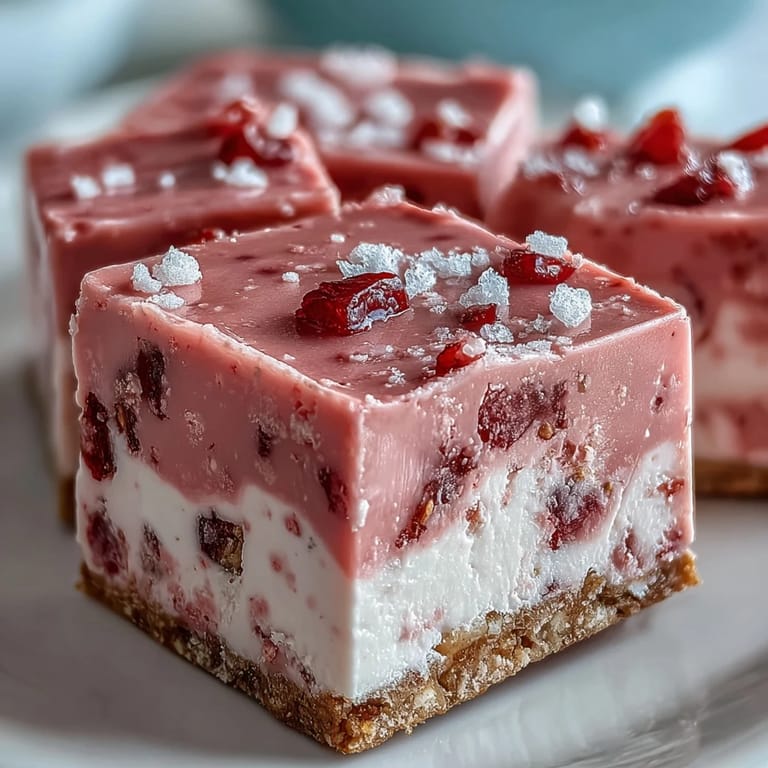
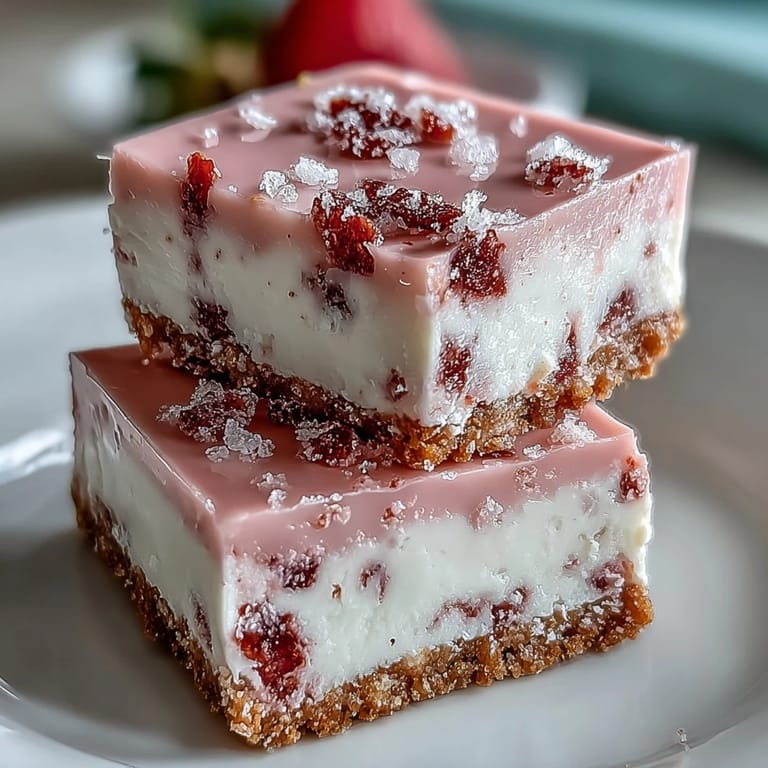
 My cousin showed up one Saturday with a bag of freeze-dried strawberries and a wild idea. She'd been experimenting with fudge all week, trying to capture real fruit flavor without the moisture that ruins texture. We melted white chocolate right there on my stove, stirred in that bright powder, and watched the mixture turn the most ridiculous shade of pink. When we pulled the first batch from the fridge and cut into those firm, creamy squares, we both knew she'd cracked it.
I brought a tin of these to a potluck once, and three people asked if I'd ordered them from a fancy bakery. One friend grabbed two squares before the meal even started, muttering something about needing quality control. By the time dessert rolled around, only crumbs remained, and I had five requests for the recipe scribbled on napkins. It's become my go-to whenever I need to impress without breaking a sweat.
Ingredients
- Digestive biscuits or graham crackers: The base needs to be sturdy enough to support that fudge layer, and their slight sweetness keeps the crust from tasting flat.
- Unsalted butter: Melted butter binds the crumbs together and adds richness without making the crust greasy if you measure carefully.
- White chocolate chips or chopped white chocolate: Quality matters here because cheaper brands can seize or turn grainy, so grab a bar you'd actually enjoy eating on its own.
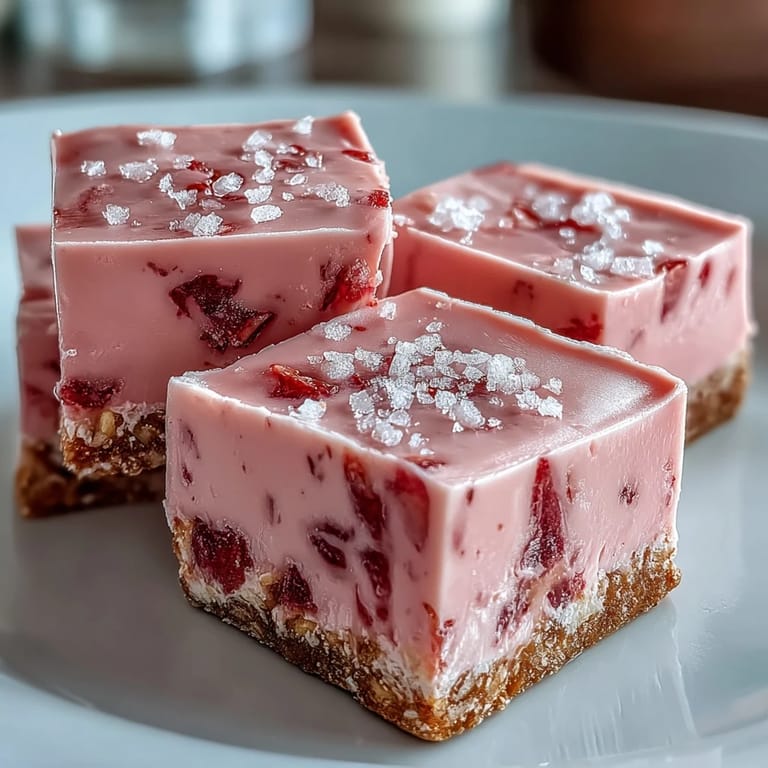
- Sweetened condensed milk: This is what gives the fudge its signature creamy, dense texture and just enough sweetness to balance the tangy berries.
- Freeze-dried strawberries: Ground to powder, they pack pure fruit flavor without adding liquid that would prevent the fudge from setting properly.
- Pure vanilla extract: A teaspoon rounds out the sweetness and makes the strawberry taste more complex and less one-note.
- Pinch of salt: Don't skip this, it sharpens all the flavors and keeps the fudge from tasting cloyingly sweet.
- Pink or red gel food coloring: Totally optional, but a drop or two transforms the color from pale blush to that cheerful, Instagram-worthy pink.
Tired of Takeout? 🥡
Get 10 meals you can make faster than delivery arrives. Seriously.
One email. No spam. Unsubscribe anytime.
Instructions
- Prepare the pan:
- Line your square pan with parchment, letting it hang over two sides like little handles. This trick means you'll lift the whole slab out later instead of wrestling with a spatula in tight corners.
- Make the crust:
- Toss crushed biscuits with melted butter until every crumb looks damp and the mixture clumps when you squeeze it. Press it down hard and evenly so it doesn't crumble when you cut the squares later.
- Chill the base:
- Pop the pan in the fridge for ten minutes to firm up the crust. This step keeps the fudge layer from soaking in and making everything soggy.
- Melt the chocolate:
- Set a heatproof bowl over simmering water and add white chocolate and condensed milk, stirring gently until completely smooth. Patience here prevents scorching, which turns chocolate grainy and weird.
- Add the strawberry:
- Stir in your strawberry powder, vanilla, salt, and coloring off the heat, mixing until the color is uniform and no streaks remain. The powder dissolves fast, so don't overmix or you'll cool it too much.
- Assemble:
- Pour the fudge over the chilled crust and spread it to every corner with a spatula. Tap the pan gently on the counter to release any air bubbles hiding underneath.
- Set:
- Cover loosely and refrigerate for at least two to three hours until the top feels firm when you press it lightly. Rushing this step leaves you with a gooey mess that won't slice cleanly.
- Cut and serve:
- Lift the slab out using the parchment, then slice into sixteen squares with a sharp knife, wiping it clean between cuts. Garnish if you like, then serve them cold or let them sit out briefly for a softer bite.
 Save to Pinterest
 There's something quietly satisfying about slicing into a pan of these and seeing those clean pink layers. My niece calls them fancy Starburst, which isn't entirely wrong but also doesn't capture how creamy and rich they actually are. Every time I make them, someone ends up standing at the counter with a square in each hand, trying to decide if a third is socially acceptable.
Choosing Your Strawberries
Freeze-dried strawberries are worth hunting down because they concentrate all the fruit flavor without the water content that can ruin fudge texture. I've found them in the snack aisle, near the dried fruit, or online in bulk bags that last for months. If you go the fresh route, cook the puree down until it's thick as jam and cool it completely before adding it to the chocolate, or you'll end up with a runny mess that never firms up.
Storing and Gifting
These keep beautifully in the fridge for up to five days, stacked between parchment in an airtight container so they don't dry out or absorb other flavors. I've packed them in small bakery boxes tied with ribbon for neighbors, and they travel surprisingly well as long as you keep them cool. Let them sit at room temperature for about ten minutes before serving if you want that melt-in-your-mouth softness instead of a firm fudge snap.
Variations Worth Trying
Once you've nailed the basic recipe, it's ridiculously easy to swap in other freeze-dried fruits like raspberries, blueberries, or even mango for completely different flavors. I've done a swirl by dividing the fudge mixture and folding crushed freeze-dried raspberries into half, then spooning both into the pan and dragging a knife through for a marbled look. You can also press chopped nuts or mini chocolate chips into the top before chilling for extra texture.
- Try dairy-free white chocolate and coconut condensed milk for a version that tastes just as indulgent.
- Add a tablespoon of lemon zest to the fudge for a bright, summery twist that cuts the sweetness.
- Dust the finished squares with freeze-dried strawberry powder or edible glitter for a party-ready presentation.
 Save to Pinterest
 These squares prove that impressive desserts don't need an oven or a culinary degree, just good ingredients and a little patience. Make them once, and you'll have a new favorite trick for every potluck, bake sale, or random Tuesday when you need something sweet.
Recipe Questions & Answers
- → How long do these strawberry fudge squares need to chill?
The fudge layer requires at least 2-3 hours in the refrigerator to firm completely. For best results, chill overnight before cutting.
- → Can I use fresh strawberries instead of freeze-dried?
Yes, purée 100g fresh strawberries and strain thoroughly to remove seeds. Note that fresh strawberries add moisture which may slightly affect the fudge texture.
- → How should I store these fudge squares?
Keep in an airtight container in the refrigerator for up to 5 days. The cold temperature maintains the fudge texture and prevents melting.
- → Can I make these dairy-free?
Substitute dairy-free white chocolate and coconut condensed milk for the traditional versions. The texture remains similar while accommodating dietary needs.
- → What's the best way to cut clean squares?
Use a sharp knife and wipe the blade clean between each cut. For even cleaner slices, warm the knife under hot water and dry thoroughly before cutting.
- → Can I add other berries to this fudge?
Try swirling in crushed raspberries for a marbled effect or replace the strawberry powder with raspberry, blackberry, or mixed berry powder.