 Save to Pinterest
 My sister called me three weeks before her graduation asking if I could bake something for her party, and honestly, my first thought was relief that she didn't ask for a tiered masterpiece. A sheet cake felt like breathing room—the kind of cake that feeds a crowd without demanding perfection, yet somehow tastes like you spent hours on it. I'd made versions before at potlucks and family gatherings, but never one meant to celebrate something this big. That's when I realized a simple vanilla sheet cake could be the perfect canvas for making someone's milestone feel truly special.
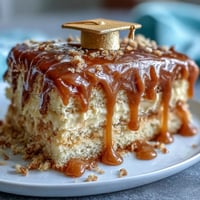
I'll never forget sliding that cake out of the oven on graduation morning, the kitchen filling with that warm vanilla smell that somehow felt like comfort and pride all at once. My hands were shaking a little as I spread the buttercream—not because I was nervous about baking, but because I was decorating something that mattered. When I piped Class of 2026 in her school colors and saw my sister's face light up, I understood that this cake wasn't about technique; it was about showing up for someone on their day.
Ingredients
- All-purpose flour: Two and a half cups is the backbone here—measure by spooning into your measuring cup rather than scooping straight from the bag, or you'll end up with a dense cake that nobody wants.
- Baking powder: This is what makes the cake rise into something fluffy and cloud-like; don't skip it or reduce it thinking you're being clever.
- Salt: Just a pinch, but it wakes up the vanilla and balances the sweetness in a way people can't quite identify but absolutely feel.
- Unsalted butter: Two cups total, and room temperature is non-negotiable; cold butter won't cream properly with the sugar, and you'll end up with a grainy, heavy cake.
- Granulated sugar: This creams with the butter to create tiny air pockets that make the cake light; rushing this step or skipping the three minutes of beating will show in the final texture.
- Eggs: Four large ones, and bringing them to room temperature helps them incorporate smoothly and evenly throughout the batter.
- Vanilla extract: Use real vanilla if you can; the flavor difference is subtle but unmissable, especially in something this simple.
- Whole milk: Room temperature milk prevents the batter from seizing up when you add it to the warm butter and eggs.
- Powdered sugar for frosting: Sift it first, or you'll spend ten minutes trying to beat out lumps that never quite disappear.
- Food coloring: Gel coloring is stronger than liquid, so you won't have to add as much and risk thinning out your frosting; I learned this the hard way.
Tired of Takeout? 🥡
Get 10 meals you can make faster than delivery arrives. Seriously.
One email. No spam. Unsubscribe anytime.
Instructions
- Set yourself up for success:
- Preheat your oven to 350°F and grease that 9x13-inch pan generously, then line it with parchment paper so the cake releases easily. Having everything prepped before you start mixing is the difference between a smooth bake and a frantic one.
- Combine your dry ingredients:
- Whisk together the flour, baking powder, and salt in a medium bowl until they're evenly distributed. This little step prevents lumps and ensures the leavening is spread throughout.
- Cream the butter and sugar:
- Beat them together in a large bowl for about three minutes until the mixture is pale, fluffy, and almost doubled in volume. You're basically whipping air into the butter, which is what makes the cake tender.
- Add the eggs one at a time:
- After each egg goes in, beat well so it fully incorporates before you add the next one. Pour in the vanilla extract and mix until everything is combined.
- Alternate wet and dry ingredients:
- This is the trick that keeps everything from breaking: add one third of the flour mixture, beat gently, then one third of the milk, then repeat. End with flour, and mix just until you don't see streaks of white anymore.
- Bake with confidence:
- Pour the batter into the prepared pan and smooth the top gently with a spatula. Bake for 30 to 35 minutes until a toothpick inserted in the center comes out clean with maybe a crumb or two clinging to it.
- Cool completely:
- Let the cake rest in the pan on a wire rack for at least an hour; this is when it actually sets up and becomes sturdy enough to frost. Trying to frost a warm cake is a lesson in frustration.
- Make the frosting:
- Beat the softened butter until it's creamy, then gradually add the sifted powdered sugar along with the milk, vanilla, and a pinch of salt. Beat for three to five minutes until it's fluffy and spreadable, not stiff or grainy.
- Frost and decorate:
- Spread an even layer of buttercream over the cooled cake, then divide the remaining frosting into portions and tint each one with food coloring. Pipe Class of 2026 on top using a small round tip, then scatter sprinkles or decorations across the surface.
 Save to Pinterest
 There's something magical about a sheet cake at a celebration—it's unpretentious and abundant, the kind of dessert that says "I made this for you" without any fanfare or fuss. Years later, my sister still asks me to make this cake for her friend group gatherings, and I think that's because it tastes like occasion without tasting like stress.
Why This Cake Works for Graduations
A sheet cake is the practical choice for any party where you need to feed a crowd without spending all day in the kitchen. It bakes in one pan, frosts easily, and travels well if you need to take it somewhere, unlike a layer cake that requires careful handling and assembly. The vanilla is universally loved, which means nobody's going to be disappointed, and the buttercream is sweet enough to feel celebratory but not so rich that people can only eat one bite.
Making It Personal with Piping
The Class of 2026 piping is what transforms this from a regular cake into a memory tied to a specific moment in someone's life. If you're nervous about piping, practice your letters on a piece of parchment paper first—nobody has to see your mistakes. Use a small round tip rather than a finer writing tip, because it's more forgiving and still looks intentional.
Storage and Make-Ahead Tips
This cake is incredibly flexible if you need to plan ahead; you can bake it a day early and store it unfrosted at room temperature, then frost it the morning of the party when you're fresh. If you're decorating more than a few hours before serving, keep the whole cake in a cool spot or the fridge so the buttercream stays set. The frosted cake keeps for up to two days uncovered on the counter, or five days wrapped and refrigerated—though honestly, it never lasts that long once people realize it exists.
- Bake the cake a full day ahead if you want less stress the morning of the party.
- Make the frosting up to three days early and store it in an airtight container at room temperature, then give it a quick re-beat before spreading.
- If you need to transport the cake, use a sturdy cake box and keep it on a flat surface in your car.
 Save to Pinterest
 This cake is proof that simple is often the most elegant choice, especially when you're celebrating someone's achievement. Make it, share it, and let the moment be about the person you're honoring, not about how complicated your dessert is.
Recipe Questions & Answers
- → What is the best way to achieve a moist texture?
Using room temperature butter and eggs while incorporating milk gradually helps create a tender, moist crumb.
- → How can I personalize the decoration?
Tint the buttercream with your school colors and pipe the celebratory message using a small round tip for a crisp finish.
- → How long should the cake cool before frosting?
Allow the cake to cool completely in the pan on a wire rack to prevent the buttercream from melting.
- → Can I make the frosting dairy-free?
Yes, substituting non-dairy milk and dairy-free butter alternatives works well for the frosting.
- → What tools are recommended for decorating the cake?
Using piping bags with a small round tip ensures neat lettering, while sprinkles add extra festivity.